2

I'm trying to fabricate parts to mate an electric motor to a manual car transmission (although, I think this is a more general question).

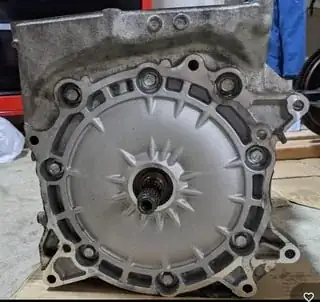
I need to connect this:

electric motor bolt face

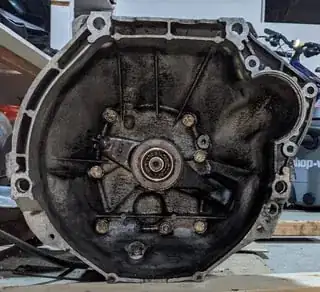
To this:

manual transmission bell housing face

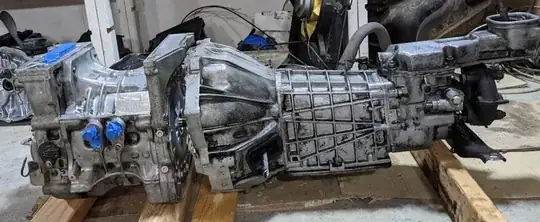
Like this:

motor and transmission set up together

The approach I'm considering is to fabricate two metal plates: one attached to the transmission and the other to the motor, with some bolts/spacers between them, sort of like this: drawing of the assembled motor and transmission
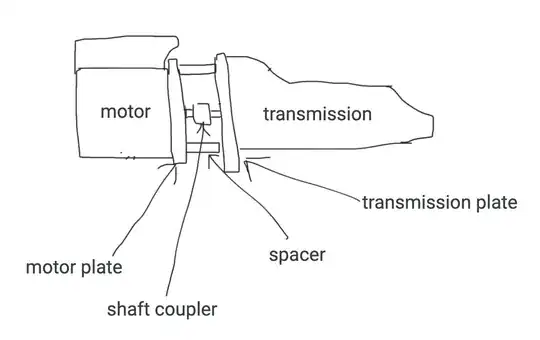
In order to do this, I need to measure the existing parts accurately--specifically I want to find the X/Y positions of the bolt holes and the output/input shafts. The most important thing is that, with everything assembled, the rotating shafts line up precisely, so I need to ensure the holes on the plates properly align with each other.

However, this has been challenging. The parts are large and heavy, have complex 3d shapes, and are sitting on a concrete garage floor that isn't necessary flat and level.

I've tried a few techniques:

  • Using a combination of calipers and a metal ruler (where the distance was larger than the caliper could reach) to measure from the closest edges of the holes to each other, or to other features, the using either Fusion 360 dimensional constraints, or a spreadsheet, to nudge things around until the dimensions are close. There seems to be enough error with my measurements, even when I thought I was being careful, that things generally don't line up well when I've done test cuts.
  • Taping a large piece of graph paper to the part, then tracing around the holes (by putting a pen through the hole where possible, or by following where the paper indents into the hole from the other side), then measuring along the graph paper with a ruler. Or, where possible, scanning the graph paper on a flatbed scanner and trying to measure with programs like Gimp or Inkscape. It's hard to get the pen marks exact, especially on deep holes.
  • Taking a picture with a camera, then trying to adjust the rotation and scale along each axis to correct it in a vector editing program. There is always quite a bit of distortion and I haven't been able to get anything to match, no matter how carefully I try to match the camera.
  • I did try iPhone LIDAR, but it's not nearly precise enough.

I was hoping the designers of these parts snapped them to round number distances so I could make educated guesses what the actual distances are, but this does not seem to be the case.

One subquestion is what my tolerances should be. I've been assuming 0.5mm. However, my attempts thus far have been off by several millimeters, so this hasn't been a major consideration yet.

My questions:

  • Are there other techniques for this sort of measurement, or perhaps things I could refine with the techniques I've already tried?
  • Are there reasonable assumptions I can make about the original design that would help me compensate for measurement errors?
JeffB
  • 121
  • 3

4 Answers4

3

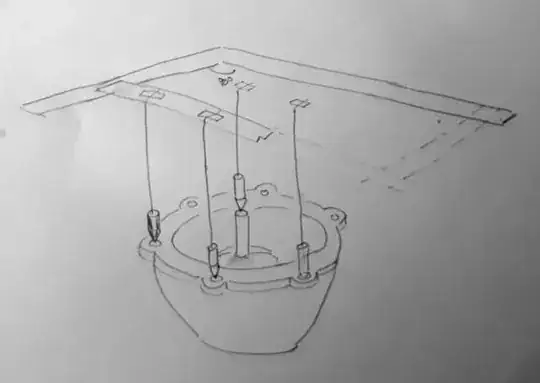
If I had to do it simply and cheaply I would consider leveling the main flange of the component to be measured and using tapered plumb-bobs suspended from a frame.

  • You'd need a right-angled reference frame from which to measure your X and Y coordinates but everything else can be a lay-on sloppy fit.
  • The plumb-bobs would need a fine hole dead-centre for the suspension thread or very fine wire to make sure that they don't rotate off vertical.
  • Mount the part securely and level with a suitable spirit or laser level.
  • Line up each plumb-bob so the taper is almost in contact with the hole and tape the thread over the support.
  • Measure the X and Y distances from the thread to the reference axes.

enter image description here

Thinking some more, there's really no need for more than one decent plumb-bob that can be moved around. The exercise now depends on how accurately you can measure the X and Y distances.

Transistor
  • 12,108
  • 2
  • 22
  • 32
2

Measurement of each feature is very case-by-case so you should be providing photos of the parts, particularly for the measurement of features that are not holes. In some cases you are be SOL without a CMM. Show us some photos of challenging areas. Sometimes specific trinkets need to be made just to enable the measurement of one particular feature.

As far as holes go, I worked with an old toolmaker who also worked as a metrologist who was dismayed that the newer generation used to CNC always worked things "by the numbers" even when it was the hard way to do certain things. You don't need to rely on the computer for everything. He told me that if you need to match existing holes, you transfer the holes, you don't measure them. This involves making the part first and then transferring the holes and drilling them.

There are all sorts of punches. Some punch through hole, some sit in blind holes, whether threaded unthreaded and punch outward. That means making the part first without the holes and then transfer punching the hole and drilling them afterwards.

UPDATE:

What if you mount mount punches into all those holes, get them level, place a plate against it and give it a whack. Then measure the marks off the flat plate. You can buy through-hole transfer punches and use shaft collars or drill stop collars as stops so they can sit in the hole but protrude out enough to clear everything to be on the same plane.

DKNguyen
  • 5,659
  • 1
  • 13
  • 23
1

As noted in the comments, metrology equipment is not inexpensive, but you may be able to make do with some form of DIY construction.

Focus on the critical dimensions and locations, especially those you can determine by direct measurement.

Create a (metal) framework that encompasses the part you are measuring, and plan to use segments of the framework as reference points. It's important to ensure that the angles of the structure you create are precise and 90° angles are your friends.

Example: You've determined that one of the critical locations is a dowel pin alignment hole on the bell housing. It's likely to be at one edge of the main part and close to the structure you've constructed. Using an appropriately fitting bolt, fastened to a metal strip, the other end of the strip then attaches to the metrology frame.

You can measure the distance more precisely in this manner, especially if the distance exceeds your tools. You can measure three points and use the math of triangles, aka trigonometry, either right triangles or otherwise, to confirm these measurements as needed.

It's bad form to base measuring from one feature to another and proper form to base measuring from a reference point. You may not have that luxury in your situation, but minimize it when possible.

Use plenty of bracing on your metrology frame, ensuring that it remains square and true. If your frame has to be fully three-dimensional, you should have a solidly braced cube with specific reference points from which to measure.

Sometimes, the work you perform to generate such a frame will exceed in hours the amount of time necessary to collect the measurements, but the approach will pay off in the long run.

fred_dot_u
  • 7,467
  • 1
  • 11
  • 17
0

First I would get some very large calipers. I just looked briefly and you can get chinesium calipers up to 1meter long for a few hundred bucks.

I would then measure carefully and create the mounting plates. Do a test fit and drill and file as necessary so that the whole thing goes together without you needing to force anything. Then you just tighten everything down.

I think your plan with the 2 plates and spacers is a good one. You can probably use a spider coupling or similar between the two which allow some slight misalignment.

Drew
  • 2,275
  • 11
  • 23